This post provides a step by step tutorial how to download, install and configure
file system image. Also the installation of
is covered. As a result we get a graphic Linux environment cooperatively running on the Windows hosting system. It can be seen as an alternative to a conventional "dual boot" configuration - but with both systems running at the same time.
Download and installation
CoLinux binary
You can download binary here.
In my case it was the stable version 0.7.3 (kernel 2.6.22.18) ... coLinux-0.7.3.exe
(an alternative could be the development version 8.0 (kernel 2.6.22.18) ...
devel-coLinux-20081130.exe, see this page for details).
Selected components:

 During the installation the WinPcap (The Windows Packet Capture Library) is installed. It can be downloaded here.
I choose stable WinPcap 4.0.2 (an alternative could be WinPcap 4.1 beta4).
 We can download (some of) available filesystem images directly during the installation:
 TAP network adapter is installed (dear Microsoft, sure we want to continue the installation ;-)
 Now the TAP adapter is installed (but not connected):
 We have to configure the private IP address of the host system (windows):

Installation paths:
CoLinux binary: c:\programs\coLinux
Filesystem images: c:\programs\coLinux\images
Configure (Windows side)
Config file
We create a new configuration file (just modify the installed example.conf):
C:\> cd programs\coLinux
C:\programs\coLinux> copy example.conf debian.conf
        1 file(s) copied.
C:\programs\coLinux> notepad debian.conf
Now we can specify root image, swap file and possibly other mount points and also define two ethernet devices - one for pcap bridge and second for TAP adapter:
...

# File contains the root file system.
# Download and extract preconfigured file from SF "Images for 2.6".
cobd0="C:\programs\coLinux\images\Debian-4.0r0-etch.ext3.1gb"
cofs1=c:\
cofs2=d:\

# Swap device, should be an empty file with 128..512MB.
cobd1="C:\programs\coLinux\images\swap_file.1gb"

# Tell kernel the name of root device (mostly /dev/cobd0,
# /dev/cobd/0 on Gentoo)
# This parameter will be forward to Linux kernel.
root=/dev/cobd0

# Additional kernel parameters (ro = rootfs mount read only)
ro

# Initrd installs modules into the root file system.
# Need only on first boot.
initrd=initrd.gz

# Maximal memory for linux guest
#mem=64

# Slirp for internet connection (outgoing)
# Inside running coLinux configure eth0 with this static settings:
# ipaddress 10.0.2.15   broadcast  10.0.2.255   netmask 255.255.255.0
# gateway   10.0.2.2    nameserver 10.0.2.3
#eth0=slirp

# pcap bridge for internet connection (outgoing)
eth0=pcap-bridge,"Local Area Connection",<an-artificial-mac-address>

# Tuntap as private network between guest and host on second linux device
eth1=tuntap

# Setup for serial device
#ttys0=COM1,"BAUD=115200 PARITY=n DATA=8 STOP=1 dtr=on rts=on"

# Run an application on colinux start (Sample Xming, a Xserver)
# exec0=C:\Programs\Xming\Xming.exe,":0 -clipboard -multiwindow -ac"
Swap file
Also you have to create a swap file, here is how to create it, or if you are lazy like me, you can download one from this site (user Gniarf provides also other interesting info).
Configure (Linux side)
Start colinux daemon:
C:\programs\coLinux> colinux-daemon.exe @debian.conf
Cooperative Linux Daemon, 0.7.3
Daemon compiled on Sat May 24 22:36:07 2008

PID: 3268
error 0x2 in execution
error launching console
daemon: exit code 8200c401
daemon: error - CO_RC_ERROR_ERROR, line 49, file src/colinux/os/winnt/user/exec.c (16)
We did not install the generic console so we have to explicitly say we want to launch the NT console:
C:\programs\coLinux> colinux-daemon.exe -t nt @debian.conf
...
Login as root (a default password is "root"):
login as: root
root@10.0.2.2's password:
Linux debian 2.6.22.18-co-0.7.3 #1 PREEMPT Sat May 24 22:27:30 UTC 2008 i686

The programs included with the Debian GNU/Linux system are free software;
the exact distribution terms for each program are described in the
individual files in /usr/share/doc/*/copyright.

Debian GNU/Linux comes with ABSOLUTELY NO WARRANTY, to the extent
permitted by applicable law.
Change the root password
deb# passwd
Enter new UNIX password:
Retype new UNIX password:
passwd: password updated successfully
Network
For easy to use the network is pre-configured for "slirp":
deb# ifconfig
eth0      Link encap:Ethernet  HWaddr 22:01:76:23:42:12
          inet addr:10.0.2.15  Bcast:10.0.2.255  Mask:255.255.255.0
          UP BROADCAST RUNNING MULTICAST  MTU:1500  Metric:1
          RX packets:59 errors:0 dropped:0 overruns:0 frame:0
          TX packets:0 errors:0 dropped:0 overruns:0 carrier:0
          collisions:0 txqueuelen:1000
          RX bytes:20682 (20.1 KiB)  TX bytes:0 (0.0 b)
          Interrupt:2

lo        Link encap:Local Loopback
          inet addr:127.0.0.1  Mask:255.0.0.0
          UP LOOPBACK RUNNING  MTU:16436  Metric:1
          RX packets:0 errors:0 dropped:0 overruns:0 frame:0
          TX packets:0 errors:0 dropped:0 overruns:0 carrier:0
          collisions:0 txqueuelen:0
          RX bytes:0 (0.0 b)  TX bytes:0 (0.0 b)
We change it to dual-ethernet mode (one for uoutide world connection and other for private network between guest and host system):
deb# nano /etc/network/interfaces

Comment out the following:

    # The primary network interface (slirp)
    auto eth0
    iface eth0 inet static
       address 10.0.2.15
       broadcast 10.0.2.255
       netmask 255.255.255.0
       gateway 10.0.2.2

And replace it with following:

    # The primary network interface
    auto eth0
    iface eth0 inet dhcp

Then there is the following:

    # Second network (tap-win32)
    #auto eth1
    #iface eth1 inet static
    #   address 192.168.0.40
    #   netmask 255.255.255.0

... leave it as is (or remove it) and add the following:

    auto eth1
    iface eth1 inet static
       address 10.0.2.2
       network 10.0.2.0
       netmask 255.255.255.0
       broadcast 10.0.2.255
Now save the file and reboot:
deb# reboot
...
We should see now on the Windows side that the TAP adapter is connected:
 After we login to linux, we can examine the new network configuration:
deb# ifconfig
eth0      Link encap:Ethernet  HWaddr <an-artificial-mac-address>
          inet addr:192.168.1.196  Bcast:192.168.1.255  Mask:255.255.255.0
          UP BROADCAST RUNNING MULTICAST  MTU:1500  Metric:1
          RX packets:17220 errors:0 dropped:0 overruns:0 frame:0
          TX packets:11031 errors:0 dropped:0 overruns:0 carrier:0
          collisions:0 txqueuelen:1000
          RX bytes:24760203 (23.6 MiB)  TX bytes:770417 (752.3 KiB)
          Interrupt:2

eth1      Link encap:Ethernet  HWaddr 00:FF:68:B7:70:00
          inet addr:10.0.2.2  Bcast:10.0.2.255  Mask:255.255.255.0
          UP BROADCAST RUNNING MULTICAST  MTU:1500  Metric:1
          RX packets:17 errors:0 dropped:0 overruns:0 frame:0
          TX packets:0 errors:0 dropped:0 overruns:0 carrier:0
          collisions:0 txqueuelen:1000
          RX bytes:2238 (2.1 KiB)  TX bytes:0 (0.0 b)
          Interrupt:2

lo        Link encap:Local Loopback
          inet addr:127.0.0.1  Mask:255.0.0.0
          UP LOOPBACK RUNNING  MTU:16436  Metric:1
          RX packets:0 errors:0 dropped:0 overruns:0 frame:0
          TX packets:0 errors:0 dropped:0 overruns:0 carrier:0
          collisions:0 txqueuelen:0
          RX bytes:0 (0.0 b)  TX bytes:0 (0.0 b)
Packaging system
Now (we are connected to the internet) it is time to update the package system and upgrade installed packages:
deb# apt-get update
...
deb# apt-get upgrade
The following packages will be upgraded:
  bsdutils cpio debconf debconf-i18n debian-archive-keyring dpkg e2fslibs
  e2fsprogs findutils initscripts libblkid1 libc6 libcomerr2 libgnutls13
  libpam-modules libpam-runtime libpam0g libss2 libuuid1 lsb-base mount nano
  perl-base sysv-rc sysvinit sysvinit-utils tar tzdata util-linux
29 upgraded, 0 newly installed, 0 to remove and 0 not upgraded.
Need to get 12.3MB of archives.
After unpacking 1786kB disk space will be freed.
Do you want to continue [Y/n]? Y
...
Mount table
Now we can modify the mount table:
deb# nano /etc/fstab
... add the following if you want to mount C: and D: windows drives (we made it available as cofs devices in debian.conf file):
cofs1            /mnt/c         cofs    defaults,noatime  0      0
cofs2            /mnt/d         cofs    defaults,noatime  0      0
Of course you can add anything you want, for example I wanted to make a cifs mount to a NAS directory:
//storage/filodej /mnt/storage/filodej cifs defaults,credentials=/etc/storage.smbpass 0 0
The storage-filodej.smbpass is a file readable just by root and containing a username and his password:
deb# cd /etc
deb# echo "username=filodej" > storage.smbpass
deb# chmod 600 storage.smbpass
deb# echo "password=<filodej-password>" >> storage.smbpass
deb# cat storage.smbpass
username=filodej
password=<filodej-password>
Now we have to create corresponding mount point directories:
deb# cd /mnt
deb# mkdir c
deb# mkdir d
deb# mkdir --parents storage/filodej
Test the mount table:
deb# mount -a
mount: wrong fs type, bad option, bad superblock on //storage/filodej,
       missing codepage or other error
       In some cases useful info is found in syslog - try
       dmesg | tail  or so
It seems I forgot to to install the samba file system:
deb# apt-get install smbfs

Reading package lists... Done
Building dependency tree... Done
The following extra packages will be installed:
  libkrb53 libpopt0 samba-common
Suggested packages:
  krb5-doc krb5-user smbclient
The following NEW packages will be installed:
  libkrb53 libpopt0 samba-common smbfs
0 upgraded, 4 newly installed, 0 to remove and 0 not upgraded.
Need to get 3232kB of archives.
After unpacking 7827kB of additional disk space will be used.
Do you want to continue [Y/n]? Y
...
During the installation we have to specify the Domain/Workgroup name and decide whether to use WINS settings from DHCP (and install dhcp3-client package).
Now the command:
deb# mount -a
... works as expected.
Install CoLinux as a Windows Service
We need to be able to access the running linux system somehow. I am using mostly the SSH for that purpose.
First we have to install ssh daemon it on the linux system:
deb# apt-get install ssh
Reading package lists... Done
Building dependency tree... Done
The following extra packages will be installed:
  libedit2 libssl0.9.8 openssh-blacklist openssh-client openssh-server
Suggested packages:
  ssh-askpass xbase-clients rssh molly-guard
The following NEW packages will be installed:
  libedit2 libssl0.9.8 openssh-blacklist openssh-client openssh-server ssh
0 upgraded, 6 newly installed, 0 to remove and 0 not upgraded.
Need to get 5779kB of archives.
After unpacking 12.7MB of additional disk space will be used.
Do you want to continue [Y/n]? Y
...
Setting up ssh (4.3p2-9etch3) ...

deb# eth0: duplicate address detected!
The duplicate address detected! issue is described here.
I have associated the <an-artificial-mac-address> with static-DHCP assigned IP but the warning stil does persist. If anyone knows the solution, please let me know!
Anyway the ssh daemon is now up and running and we are able to connect to the linux system via ssh (on the host machine we can use either eth0 public IP or better the eth1 private IP).
Now we are ready to create a windows service and run the colinux as a service.
The detailed guide for the service creation can be seen here.
The following command does the job:
C:\programs\coLinux> colinux-daemon @debian.conf --install-service "coLinux-Debian"
Cooperative Linux Daemon, 0.7.3
Daemon compiled on Sat May 24 22:36:07 2008

daemon: installing service 'coLinux-Debian'
daemon: service command line: "c:\programs\coLinux\colinux-daemon.exe" @debian.conf --run-service "coLinux-Debian"
daemon: setting restart options
daemon: service installed.
Now we can start colinux daemon as a service:
C:\programs\coLinux> net start "coLinux-Debian"

The coLinux-Debian service was started successfully.
Linux administration
Create a new user
[Add user howto]
deb# adduser --home /home/filodej --ingroup users filodej
Adding user `filodej' ...
Adding new user `filodej' (1001) with group `users' ...
Creating home directory `/home/filodej' ...
Copying files from `/etc/skel' ...
Enter new UNIX password:
Retype new UNIX password:
passwd: password updated successfully
Changing the user information for filodej
Enter the new value, or press ENTER for the default
        Full Name []: Filodej
        Room Number []:
        Work Phone []:
        Home Phone []:
        Other []:
Is the information correct? [y/N] y
Install sudo
[linux sudo command]
deb# apt-get install sudo
Reading package lists... Done
Building dependency tree... Done
The following NEW packages will be installed:
  sudo
0 upgraded, 1 newly installed, 0 to remove and 36 not upgraded.
Need to get 162kB of archives.
After unpacking 406kB of additional disk space will be used.
Get:1 http://ftp.debian.org etch/main sudo 1.6.8p12-4 [162kB]
Fetched 162kB in 1s (95.8kB/s)
Selecting previously deselected package sudo.
(Reading database ... 25225 files and directories currently installed.)
Unpacking sudo (from .../sudo_1.6.8p12-4_i386.deb) ...
Setting up sudo (1.6.8p12-4) ...
No /etc/sudoers found... creating one for you.
Let's look at the sudoers definition file:
deb# cat /etc/sudoers
# /etc/sudoers
#
# This file MUST be edited with the 'visudo' command as root.
#
# See the man page for details on how to write a sudoers file.
#

Defaults        env_reset

# Host alias specification

# User alias specification

# Cmnd alias specification

# User privilege specification
root    ALL=(ALL) ALL
Now we can make the new user sudoer:
deb# visudo
...
Let's look at the result:
deb# cat /etc/sudoers
# /etc/sudoers
#
# This file MUST be edited with the 'visudo' command as root.
#
# See the man page for details on how to write a sudoers file.
#

Defaults        env_reset

# Host alias specification

# User alias specification
filodej    ALL=(ALL) ALL

# Cmnd alias specification

# User privilege specification
root    ALL=(ALL) ALL
Resize the root filesystem
[Expanding root filesystem howto]
I decided for the most reliable way.
First we look at the current filesystem:
deb# df
Filesystem           1K-blocks      Used Available Use% Mounted on
/dev/cobd0             1031064    197876    780812  21% /
tmpfs                   387996         0    387996   0% /lib/init/rw
udev                     10240        16     10224   1% /dev
tmpfs                   387996         0    387996   0% /dev/shm
cofs1                156280288  44298800 111981488  29% /mnt/c
cofs2                156280288    240400 156039888   1% /mnt/d
//storage/filodej     10175328   2711828   7463500  27% /mnt/storage/filodej
Now we halt the system (if we are logged as a normal user, we have to use sudo):
deb# sudo halt
...
Broadcast message from root@debian (pts/2) (Wed Dec 10 05:11:48 2008):

The system is going down for system halt NOW!
On windows we now go to the images directory:
C:\> cd programs\coLinux\images

C:\programs\coLinux\images> dir
 Volume in drive C has no label.
 Volume Serial Number is F488-7A65

 Directory of C:\programs\coLinux\images

01/06/2009  21:49    <DIR>          .
01/06/2009  21:49    <DIR>          ..
01/06/2009  20:29     1,072,693,248 Debian-4.0r0-etch.ext3.1gb
03/27/2008  19:59        40,795,971 Debian-clean.1gb.bz2
12/22/2008  22:32     1,073,741,824 swap_file.1gb
               3 File(s)  2,187,231,043 bytes
               2 Dir(s)  124,332,199,936 bytes free
Now make a backup copy of the old filesystem:
C:\programs\coLinux\images> copy Debian-4.0r0-etch.ext3.1gb Debian-4.0r0-etch.ext3.1gb.tmp
        1 file(s) copied.
Create a new (empty) file (e.g. 8GB in this case):
C:\programs\coLinux\images> fsutil file createnew Debian-4.0r0-etch.ext3.8gb 8589934592
File C:\programs\coLinux\images\Debian-4.0r0-etch.ext3.8gb is created
Let's list the images directory again:'
C:\programs\coLinux\images> dir
 Volume in drive C has no label.
 Volume Serial Number is F488-7A65

 Directory of C:\programs\coLinux\images

01/06/2009  22:02    <DIR>          .
01/06/2009  22:02    <DIR>          ..
01/06/2009  13:07     1,072,693,248 Debian-4.0r0-etch.ext3.1gb
01/06/2009  20:29     1,072,693,248 Debian-4.0r0-etch.ext3.1gb.tmp
01/06/2009  22:02     8,589,934,592 Debian-4.0r0-etch.ext3.8gb
03/27/2008  20:59        40,795,971 Debian-clean.1gb.bz2
01/06/2009  22:02                 0 fsutil
12/22/2008  22:32     1,073,741,824 swap_file.1gb
               6 File(s) 11,849,858,883 bytes
               2 Dir(s)  114,669,043,712 bytes free
Now we can modify the debian.conf configuration file as follows:
C:\programs\coLinux\images> cd ..

C:\programs\coLinux> notepad debian.conf
Add the two newly created file images as block devices:
# File contains the root file system.
# Download and extract preconfigured file from SF "Images for 2.6".
cobd0="C:\programs\coLinux\images\Debian-4.0r0-etch.ext3.1gb"
cobd3="C:\programs\coLinux\images\Debian-4.0r0-etch.ext3.1gb.tmp"
cobd4="C:\programs\coLinux\images\Debian-4.0r0-etch.ext3.8gb"
cofs1=c:\
cofs2=d:\
Now we can boot the colinux up and login as root:
C:\programs\coLinux> colinux-daemon.exe -t nt @debian.conf
...
debian login: root
Password:
...
deb#
Now we check if the the copy of the old filesystem is clean:
deb# e2fsck /dev/cobd3
e2fsck 1.40-WIP (14-Nov-2006)
/dev/cobd3: clean, 8967/131072 files, 53582/261888 blocks
If we now try to check the empty image, we (presumably) get the error:
deb# e2fsck /dev/cobd4
e2fsck 1.40-WIP (14-Nov-2006)
Couldn't find ext2 superblock, trying backup blocks...
e2fsck: Bad magic number in super-block while trying to open /dev/cobd4

The superblock could not be read or does not describe a correct ext2
filesystem.  If the device is valid and it really contains an ext2
filesystem (and not swap or ufs or something else), then the superblock
is corrupt, and you might try running e2fsck with an alternate superblock:
    e2fsck -b 8193 <device>
Let's copy the raw data from the old image to the new:
deb# dd if=/dev/cobd3 of=/dev/cobd4
2095104+0 records in
2095104+0 records out
1072693248 bytes (1.1 GB) copied, 110.632 seconds, 9.7 MB/s
Now we can check the filesystem (-f will force checking even if filesystem is marked clean):
deb# e2fsck -f /dev/cobd4
e2fsck 1.40-WIP (14-Nov-2006)
Pass 1: Checking inodes, blocks, and sizes
Pass 2: Checking directory structure
Pass 3: Checking directory connectivity
Pass 4: Checking reference counts
Pass 5: Checking group summary information
/dev/cobd4: 8967/131072 files (0.6% non-contiguous), 53582/261888 blocks
Let's resize the filesystem from 1GB to 8GB:
deb# resize2fs -p /dev/cobd4
resize2fs 1.40-WIP (14-Nov-2006)
Resizing the filesystem on /dev/cobd4 to 2097152 (4k) blocks.
Begin pass 1 (max = 56)
Extending the inode table     XXXXXXXXXXXXXXXXXXXXXXXXXXXXXXXXXXXXXXXX
The filesystem on /dev/cobd4 is now 2097152 blocks long.
... and check it again:
deb# e2fsck -f /dev/cobd4
e2fsck 1.40-WIP (14-Nov-2006)
Pass 1: Checking inodes, blocks, and sizes
Pass 2: Checking directory structure
Pass 3: Checking directory connectivity
Pass 4: Checking reference counts
Pass 5: Checking group summary information
/dev/cobd4: 8967/1048576 files (0.6% non-contiguous), 82374/2097152 blocks
Now we are almost done and can halt the system:
deb# halt
In windows we can modify the debian.conf configuration file again:
C:\programs\coLinux> notepad debian.conf
Remove the two newly block devices and change the root file system to Debian-4.0r0-etch.ext3.8gb:
# File contains the root file system.
# Download and extract preconfigured file from SF "Images for 2.6".
#cobd0="C:\programs\coLinux\images\Debian-4.0r0-etch.ext3.1gb"
cobd0="C:\programs\coLinux\images\Debian-4.0r0-etch.ext3.8gb"
cofs1=c:\
cofs2=d:\
Now we can boot the colinux up and login:
C:\programs\coLinux> colinux-daemon.exe -t nt @debian.conf
...
debian login: root
Password:
...
deb#
Now we can inspect the free space we have:
deb# df
Filesystem           1K-blocks      Used Available Use% Mounted on
/dev/cobd0             8256952    197876   7723532   3% /
tmpfs                   387996         0    387996   0% /lib/init/rw
udev                     10240        16     10224   1% /dev
tmpfs                   387996         0    387996   0% /dev/shm
cofs1                156280288  44281916 111998372  29% /mnt/c
cofs2                156280288    240400 156039888   1% /mnt/d
//storage/filodej     10175328   2711828   7463500  27% /mnt/storage/filodej
We are done for now, if everything goes fine we can possibly delete both the original image and its temporary copy.
GNOME installation
[HOWTO: Minimal Debian Install (GNOME/KDE)]
[Installing x server]
You have to decide what display manager
and Desktop environment to install.
Following table shows the numbers of packages and download and intallation sizes for "core" and "full" variations of mainstream environments
GDM/GNOME and
KDM/KDE:
|
# packages |
Archive size |
Additional disk space |
| xorg |
109 |
54.6 MB |
143 MB |
| xorg + gnome-core |
274 |
142 MB |
461 MB |
| xorg + gnome |
472 |
300 MB |
931 MB |
| xorg + kde-core |
208 |
120 MB |
318 MB |
| xorg + kde |
543 |
312 MB |
830 MB |
I decided to try "full" GNOME installation:
deb# apt-get install xorg gnome
...
0 upgraded, 472 newly installed, 0 to remove and 0 not upgraded.
Need to get 300MB of archives.
After unpacking 931MB of additional disk space will be used.
Do you want to continue [Y/n]? Y
...
... during the relatively lenthy process of the installation (on my machine it was 30 minutes for downloading and 15 minutes of installation) the xserver-xorg is configured and we are asked for desired screen resolutions. We are going to uninstall this package anyway so I do not think the settings we choose have any significant effect.
After the installation is finished we can inspect the free space:
debian:~# df
Filesystem           1K-blocks      Used Available Use% Mounted on
/dev/cobd0             8256952   1430612   6490796  19% /
tmpfs                   387996         0    387996   0% /lib/init/rw
udev                     10240        16     10224   1% /dev
tmpfs                   387996         0    387996   0% /dev/shm
cofs1                156280288  44284428 111995860  29% /mnt/c
cofs2                156280288    240400 156039888   1% /mnt/d
//storage/filodej     10175328   2711828   7463500  27% /mnt/storage/filodej
... and see that (as expected) the amount of used space on the root filesystem actually risen by approximately 1.2 GB.
NX server
[NX technology]
[FreeNX]
[A look at NoMachine NX]
[NoMachine NX server free edition]
[Installing NoMachine NX server]
[NX keyboard shortcuts]
The following is written about the licensing model of NX technology on wikipedia:
NoMachine uses the GNU General Public License for the core NX technology, while at the same time offering non-free commercial NX server[2] and client products for Linux, Microsoft Windows, Solaris, Mac OS X and embedded systems.
Due to the free software nature of NX, the FreeNX project was started in order to provide the wrapper scripts for the GPL NX libraries. FreeNX is developed and maintained by Fabian Franz.
FreeNX server
At first I tried to install the FreeNX on my Laptop with Ubuntu installation but did not succeed. I used this and this tutorial, everything went fine, the only thing that did not work was the shadow session from windows client.
Every time I was connecting in shadow mode from windows client, nxagent on server side crashed:
Dec 19 17:08:23 notas kernel: [53641.720283] nxagent[5639]: segfault at 0000002c eip 080e9137 esp bff23b50 error 6
I tried to uninstall compiz (as someone advised) but it did not help. Maybe it was due to the client/server version incompatibility (I have used newer version of NoMachine windows client). As a result I decided to try the NoMachine NX server (free edition).
It is limited for only two users or two simultaneous connections to the server, but this limitation was not so significant for me.
NoMachine NX server
If you are using "full" GNOME installation then the first thing I would recommend to do is to install the CUPS print server. The reasons are described here (the issue was not necessarily connected with NX server, but also NX server complained when the CUPS was not installed):
deb# apt-get install cupsys
...
Now we can proceed to the actual installation.
The NX Free Edition for Linux can be downloaded from this page. The release I am using is 3.3.0-8.
For the installation of NX server I have followed this tutorial.
We will need three packages: nxclient, nxnode and nxserver:
deb# cd /tmp
deb# wget http://64.34.161.181/download/3.3.0/Linux/nxclient_3.3.0-3_i386.deb
...
Length: 3,859,966 (3.7M) [application/x-debian-package]
...
deb# wget http://64.34.161.181/download/3.3.0/Linux/nxnode_3.3.0-3_i386.deb
Length: 6,251,244 (6.0M) [application/x-debian-package]
deb# wget http://64.34.161.181/download/3.3.0/Linux/FE/nxserver_3.3.0-8_i386.deb
...
Length: 6,717,880 (6.4M) [application/x-debian-package]
...
First we have to install the client (even if we are was not going to use it):
deb# dpkg -i nxclient_3.3.0-3_i386.deb
Selecting previously deselected package nxclient.
(Reading database ... 53454 files and directories currently installed.)
Unpacking nxclient (from nxclient_3.3.0-3_i386.deb) ...
Setting up nxclient (3.3.0-3) ...
Showing file: /usr/NX/share/documents/client/cups-info

 CUPS Printing Backend

 The NX Client set-up procedure detected that your "IPP CUPS" printing
 backend doesn't allow printing from the NX session. In order to have
 printing support in your NX system, you need to set proper permissions
 on the IPP backend. Please execute:

   chmod 755 /usr/lib/cups/backend/ipp
Ok, let's do what we are told:
deb# chmod 755 /usr/lib/cups/backend/ipp
Then the nxnode has to be installed:
deb# dpkg -i nxnode_3.3.0-3_i386.deb
Selecting previously deselected package nxnode.
(Reading database ... 55884 files and directories currently installed.)
Unpacking nxnode (from nxnode_3.3.0-3_i386.deb) ...
Setting up nxnode (3.3.0-3) ...
NX> 700 Starting: install node operation at: Tue Jan 06 12:08:11 2009.
NX> 700 Autodetected system 'debian'.
NX> 700 Install log is '/usr/NX/var/log/install'.
NX> 700 Checking NX node configuration using /usr/NX/etc/node.cfg file.
NX> 700 Inspecting local CUPS environment.
NX> 700 Generating CUPS entries in: /usr/NX/etc/node.cfg.
NX> 700 Installation of version: 3.3.0-3 completed.
NX> 700 Showing file: /usr/NX/share/documents/node/cups-info

     CUPS Printing Backend

     The NX Node setup procedure could not detect your "CUPS"
     installation: either CUPS  is not installed on your system
     or it was installed in a non-standard path. CUPS is needed
     in order to enable printing support in your NX system.
     Please note that you can enable  printing support for your
     NX system at any time; to do this make sure  that you have
     CUPS installed then run:

       /usr/NX/scripts/setup/nxnode --nxprintsetup

     to specify the location of the CUPS root path.
... the CUPS related warning is hopefully not there if you have the CUPS server installed. If the warning is still there, the solution is simple:
deb# /usr/NX/scripts/setup/nxnode --nxprintsetup
NX> 701 Starting: nxprintsetup operation at: Mon Jan 05 13:14:31 2009.
NX> 701 Inspecting local CUPS environment.
NX> 701 Generating CUPS entries in: /usr/NX/etc/node.cfg.
NX> 701 CUPS configuration updated.
The last step is to install the nxserver itself:
deb# dpkg -i nxserver_3.3.0-8_i386.deb
Selecting previously deselected package nxserver.
(Reading database ... 56081 files and directories currently installed.)
Unpacking nxserver (from nxserver_3.3.0-8_i386.deb) ...
Setting up nxserver (3.3.0-8) ...
NX> 700 Installing: server at: Tue Jan 06 12:09:23 2009.
NX> 700 Autodetected system: debian.
NX> 700 Install log is: /usr/NX/var/log/install.
NX> 700 Creating configuration file: /usr/NX/etc/server.cfg.
NX> 723 Cannot start NX statistics:
NX> 709 NX statistics are disabled for this server.
NX> 700 Version '3.3.0-8' installation completed.
NX> 700 Showing file: /usr/NX/share/documents/server/install-notices

Server keys

The initial login between client and server happens through a DSA key
pair, i.e. a couple of specially generated cryptographic keys, called
the private key and the public key, which allow you to establish a
secure connection, by means of SSL encryption, between NX client and
NX server.

The public part of the key-pair is provided during the installation
of the server, while the private part of the key-pair is distributed
together with the NX Client. This ensures that each NX client is able
to authenticate to the server and to start the procedure for autho-
rizing the user and negotiating the session.

If you want to create a virtual private network (VPN) instead, you
need to generate a new DSA key-pair and distribute the private part
of the key-pair to those NX clients you want authenticated to the NX
server. More information on how to generate and distribute a new DSA
key-pair is available at:

http://www.nomachine.com/ar/view.php?ar_id=AR01C00126

Creating Users

NX is configured to allow access from any system user, as long as
valid credentials are given to the user for the SSH login. NX pro-
vides an alternative authorization method, allowing system admin-
istrators to determine which users are given access to the NX fun-
ctionalities. This works by implementing a separation between the
system password and the NX password, so that, for example, it is
possible to forbid remote access to the system by any other means
except via NX and use the NX tools to implement effective accounting
of the system resources used by the user, or to share NX passwords in
an external database.

To activate the NX user and password DBs, you will have to edit the
NX server configuration file by hand or use the NX Server Manager
Web tool available for download on the NoMachine Web site at:

http://www.nomachine.com/download-manager.php

Session Shadowing and Desktop Sharing

The session shadowing functionality allows you to share NX sessions
running on the node. The desktop sharing functionality instead, gives
access to the native display of the X server as if you were in front
of the monitor. By default you can access sessions in interactive mode
and upon authorization of the session owner. You can modify this beha-
viour by tuning the server configuration according to your needs, for
example by allowing access to sessions in view-only mode, or connecting
to either a suspended session or the local display via the Desktop
Manager login window.

Load Balancing

NX Advanced Server provides support for multi-node capabilities and
load balancing. In its current implementation, NX server can only
manage accounts on the host machine, so to grant access to the node
running remotely, you will need to create the user account directly
on the remote node host by issuing the NX node commands as root user.
You will also need to add the NX Server public DSA Key to the node to
allow this server to connect to the node running on the remote host.

Documentation

For further information on how to manage the configuration of your
NX system, please refer to the System Administrator's Guide available
on the NoMachine Web site at:

http://www.nomachine.com/documentation/admin-guide.php

The NoMachine Team.

NX> 700 Bye.
NX Client for Windows
NX Client for Windows can be downloaded from this page. Its installation is straightforward.
NX Connection wizard
With help of the NX connection wizard we can create a new session (if we are on local machine we can use the private TAP ethernet address):
 Here we choose a desktop environment (Gnome in this case) and a resolution:
 In advanced configuration we can modify everything we setup so far and much more:
 If we are on local machine I would recommend to disable image compression (icons and images then look better):
 We save the session settiongs and proceed to login dialog:
 The first time we are asked to story the RSA fingerprint (there is SSH running under the covers):
 Now we are succesfully connected to a new Gnome session:

Issues
X server start failure at boot time
When we reboot from the console we realize that X server is (unsuccesfully) started during the boot process:
 Actually we do not need xserver running on the coLinux side, we are going to connect via the NX server or use an X server running on the Windows side. As a solution we can uninstall the unnecessary gdm and xserver-xorg.
I admit that this install/uninstall approach seems weird, but currently I do not know a better solution, when I tried to just install the gnome without xorg the nxclient connection did not succeed. If someone with better knowledge of GNOME/X server/NX server dependencies knows a better approach, please, let me know.
Anyway, let's remove the GDM for now:
deb# apt-get remove gdm
Reading package lists... Done
Building dependency tree... Done
The following packages will be REMOVED:
  fast-user-switch-applet gdm gdm-themes gnome gnome-desktop-environment
0 upgraded, 0 newly installed, 5 to remove and 0 not upgraded.
Need to get 0B of archives.
After unpacking 17.4MB disk space will be freed.
Do you want to continue [Y/n]? Y
(Reading database ... 52440 files and directories currently installed.)
Removing gnome ...
Removing gnome-desktop-environment ...
Removing fast-user-switch-applet ...
Removing gdm-themes ...
Removing gdm ...
Stopping GNOME Display Manager: gdm.
... and also the xserver:
deb# apt-get remove xserver-xorg
Reading package lists... Done
Building dependency tree... Done
The following packages will be REMOVED:
  xorg xserver-xorg xserver-xorg-core xserver-xorg-input-all
  xserver-xorg-input-evdev xserver-xorg-input-kbd xserver-xorg-input-mouse
  xserver-xorg-input-synaptics xserver-xorg-video-all xserver-xorg-video-apm
  xserver-xorg-video-ark xserver-xorg-video-ati xserver-xorg-video-chips
  xserver-xorg-video-cirrus xserver-xorg-video-cyrix xserver-xorg-video-dummy
  xserver-xorg-video-fbdev xserver-xorg-video-glint xserver-xorg-video-i128
  xserver-xorg-video-i740 xserver-xorg-video-i810 xserver-xorg-video-imstt
  xserver-xorg-video-mga xserver-xorg-video-neomagic
  xserver-xorg-video-newport xserver-xorg-video-nsc xserver-xorg-video-nv
  xserver-xorg-video-rendition xserver-xorg-video-s3
  xserver-xorg-video-s3virge xserver-xorg-video-savage
  xserver-xorg-video-siliconmotion xserver-xorg-video-sis
  xserver-xorg-video-sisusb xserver-xorg-video-tdfx xserver-xorg-video-tga
  xserver-xorg-video-trident xserver-xorg-video-tseng xserver-xorg-video-v4l
  xserver-xorg-video-vesa xserver-xorg-video-vga xserver-xorg-video-via
  xserver-xorg-video-vmware xserver-xorg-video-voodoo
0 upgraded, 0 newly installed, 44 to remove and 0 not upgraded.
Need to get 0B of archives.
After unpacking 19.3MB disk space will be freed.
Do you want to continue [Y/n]? Y
...
...and reboot to make sure the boot-up startx problem is gone.
Screensaver draining the CPU
The default GNOME screensaver "Floating Debian" was relatively CPU greedy. I disabled it and choose the "Blank screen" ( Desktop -> Preferences -> Screensaver ).
Gnome stopped responding
Initially I ran the GNOME and had not the CUPS server installed. Everything went fine but after few days a problem emerged. When I logged in desktop environment after some time (typically couple dozens of seconds) it stopped responding.
When I tried to start gnome session directly from console (using XMing server), there was the same problem, but fortunately the following warning appeared on the console just about the same time the desktop stopped responding:
deb# gnome-session
...
** (gnome-cups-icon:6107): WARNING **: Could not start the printer tray icon, because the CUPS server could not be contacted.
The issue is very similar to this (unresolved) one.
It is likely that the issue is not connected with NX server, but it is a coincidence that also the NX server installation complained about the fact that the CUPS server was not installed.
As a solution I decided to install the CUPS server:
deb# apt-get install cupsys
Reading package lists... Done
Building dependency tree... Done
The following extra packages will be installed:
  cupsys-common libslp1 poppler-utils
Suggested packages:
  cupsys-bsd cupsys-driver-gutenprint cupsys-driver-gimpprint
  foomatic-filters-ppds xpdf-korean xpdf-japanese xpdf-chinese-traditional
  xpdf-chinese-simplified cups-pdf hplip slpd openslp-doc
Recommended packages:
  cupsys-client smbclient foomatic-filters
The following NEW packages will be installed:
  cupsys cupsys-common libslp1 poppler-utils
0 upgraded, 4 newly installed, 0 to remove and 0 not upgraded.
Need to get 2604kB of archives.
After unpacking 12.1MB of additional disk space will be used.
Do you want to continue [Y/n]? Y
...
The installation complained about non-multicasting kernel, but hopefully it will not be a big problem:
To reduce network traffic use a IP multicast enabled kernel

The kernel version that you are currently running does not appear to
support IP multicast. OpenSLP will continue to work even without
multicast support in the kernel by using broadcasts. However, broadcasts
are less efficient on the network, so please consider upgrading to a
multicast enabled kernel.
Missing fonts
When I run emacs the following error appeared:
deb# emacs
Warning: Cannot convert string "-*-courier-medium-r-*-*-*-120-*-*-*-*-iso8859-*" to type FontStruct
Warning: Cannot convert string "-*-helvetica-medium-r-*--*-120-*-*-*-*-iso8859-1" to type FontStruct
... and the emacs application looked as follows:

The XOrg configuration seemed ok:
deb# cat /etc/X11/xorg.conf | grep FontPath
        FontPath        "/usr/share/fonts/X11/misc"
        FontPath        "/usr/share/fonts/X11/cyrillic"
        FontPath        "/usr/share/fonts/X11/100dpi/:unscaled"
        FontPath        "/usr/share/fonts/X11/75dpi/:unscaled"
        FontPath        "/usr/share/fonts/X11/Type1"
        FontPath        "/usr/share/fonts/X11/100dpi"
        FontPath        "/usr/share/fonts/X11/75dpi"
        FontPath        "/var/lib/defoma/x-ttcidfont-conf.d/dirs/TrueType"
... the font paths really exist and contain the corresponding fonts:
deb# find /usr/share/fonts/X11/ -name *helv*
/usr/share/fonts/X11/100dpi/helvB08.pcf.gz
/usr/share/fonts/X11/100dpi/helvB10.pcf.gz
/usr/share/fonts/X11/100dpi/helvB12.pcf.gz
...
Really, there were some fonts matching the font name patterns:
deb# xlsfonts -fn '-*-helvetica-medium-r-*-*-*-120-*-*-*-*-iso8859-1'
-adobe-helvetica-medium-r-normal--12-120-75-75-p-0-iso8859-1
-adobe-helvetica-medium-r-normal--12-120-75-75-p-0-iso8859-1
-adobe-helvetica-medium-r-normal--12-120-75-75-p-67-iso8859-1
-adobe-helvetica-medium-r-normal--17-120-100-100-p-88-iso8859-1
deb# xlsfonts -fn '-*-courier-medium-r-*-*-*-120-*-*-*-*-iso8859-*'
-adobe-courier-medium-r-normal--12-120-75-75-m-0-iso8859-1
-adobe-courier-medium-r-normal--12-120-75-75-m-0-iso8859-1
-adobe-courier-medium-r-normal--12-120-75-75-m-70-iso8859-1
-adobe-courier-medium-r-normal--17-120-100-100-m-100-iso8859-1
Finally the solution (or at least workaround, since I initially thought it should not be necessary) was to download the additional fonts for nxclient (windows side) from
NoMachine site.
It helped in my case, although I don't fully understand why it was necessary, see the
note from the NoMachine site:
NOTE: The additional fonts are only needed when running very old Unix applications, requiring the use of client-side fonts. All recent Unix applications use fonts stored on the server, that are fully supported by NX.
Microsoft TrueType fonts
With default settings some websites (like Reddit) render in fonts without antialiasing. The page with such fonts looks like follows:

In font mapper settings you can probably do many things about it, but I am not expert in this area. What worked for me was to install the fonts I am used to - the msttcorefonts package.
In order to be able to install the fonts, you have to extend your sources.list to provide access to non-free packages. For detailed explanation see this post.
After the successful installation the same site looks as follows:

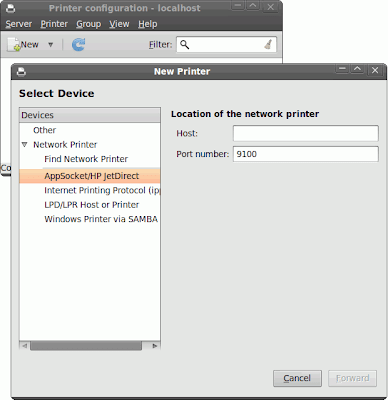
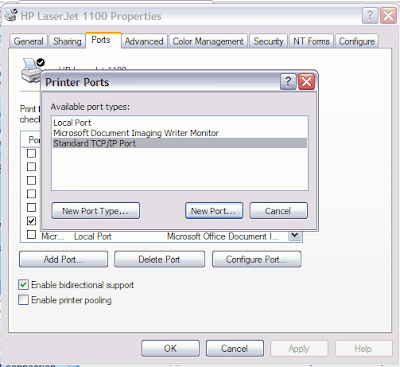 Now you select the box IP or network name:
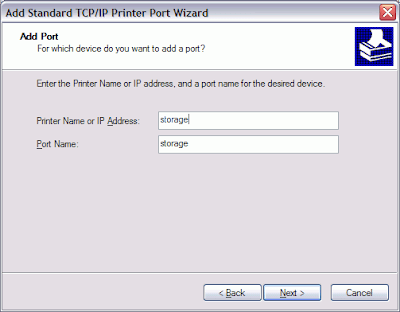 As a device type you choose the Hewlett Pacjkard Jet Direct:
 Here is a result page(SNMP not supported, RAW protocol, port 9100):
 Here we see the newly created port:
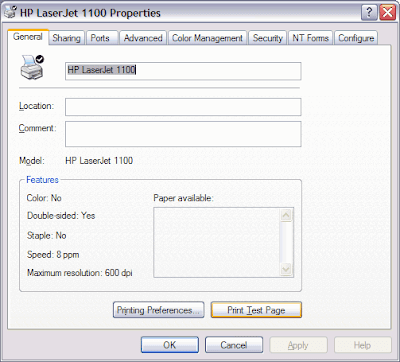
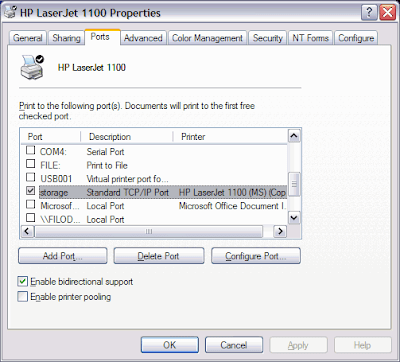 And finally we are ready to print test page:
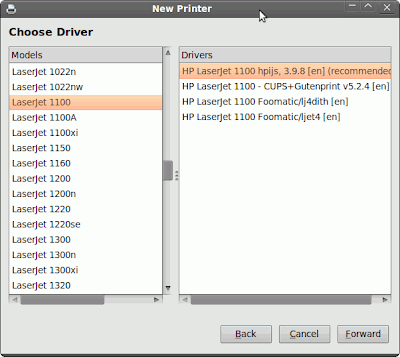
 The next step is the Printer model and driver selection:
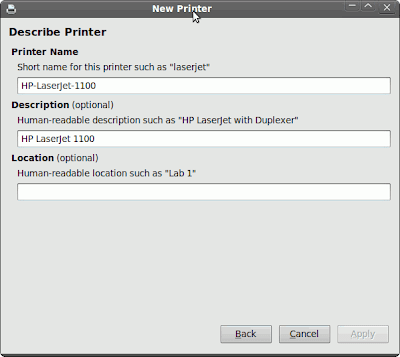
 Now we can specify the printer name and description:
 And finally we are ready to print test page:


